gPhoto and Raspberry Pi
February 12, 2019Configure your Raspberry Pi with gPhoto to automatically upload your dSLR photos to your website or cellular device
I can’t get enough of taking photos, but the major buzzkill is having to remove a SD Card and put it into the computer and import photos into Lightroom. It’s practically a necessary evil when on the road. But when “in the lab”, it feels a little bit ridiculous.
I’ve made a pretty decent setup in my lab with a Raspberry Pi, gPhoto, and TinyCore Linux (although really, any distribution will work). I’m going to assume you can make it as far as getting a Linux distribution on a Raspberry Pi, and are able to SSH into your Pi. If not, take a look at the vast resources online and jump back here afterwards!
It’s important you make sure your current camera is compatible with gPhoto. There is a comprehensive list of compatible cameras here. Even if your camera is not listed, it’s quite possible it will work but hasn’t been logged on their site.
In addition to having the Pi running Linux you’re going to need a remote trigger… there are lots of options here, but the one I went with was to re-purpose an external desktop computer case power switch with a LED light. The LED light isn’t necessary but it’s handy for visual feedback.
The one I used can be searched on Amazon:
URBEST 1.5M / 4.9Ft Desktop Computer Case Power Supply Reset HDD Momentary Switch w Front Panel
Within your distribution you will have to install:
- gphoto2 (the software to “fetch” photos from your camera)
- bcmb2835 (the C library for the Pi that gives you pin i/o access)
- curl (which most distributions have installed by default)
If your Linux distribution package manager doesn’t have any one of those, I can attest they are all pretty easy to build from source long as you have all the typical gcc utilities and run ./configure | make | make install. You shouldn’t struggle much with dependencies - if I could build them in TinyCore (which is very minimalist), they can be built in any distribution!
You can download the source for bcmb2835 here.
When you’re done you should have:
- the library /usr/local/lib/libbcm2835.a
- the binary /usr/local/bin/gphoto2
- the binary /usr/local/bin/curl
Next take the code I wrote below for the Pi and put it in the file “photouploader.c” and compile it with:
gcc -Wall -o photouploader photouploader.c -l bcm2835
|
|
Now the key is to get photouploader to run upon boot, so that whenever your Pi is power cycled the program is “spinning” listening for photo triggers. In TinyCore this is stored in the file /opt/bootlocal.sh - however every Linux distribution will have slight variations on where to add the command to run photouploader upon boot which you will have to research. For instance, I have /home/tc/photouploader (amongst other things not shown) added to my bootlocal.sh:
tc@box:~$ cat /opt/bootlocal.sh
#!/bin/sh
/home/tc/photouploader
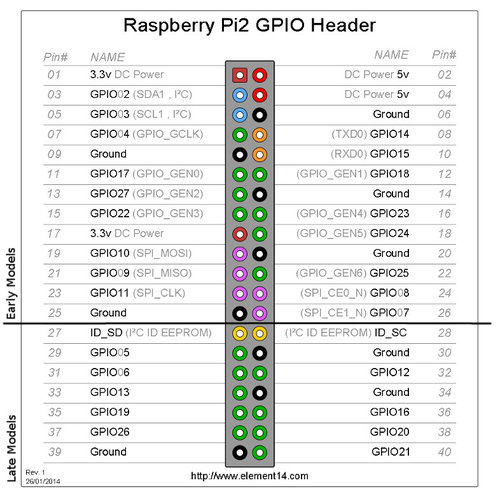
Notice in my code I have two pinouts defined - one for the momentary push button (input on GPIO15) and another for the LED light ring that is on my particular switch (output on GPIO18). The LED is handy for indicating when a part of your code is done executing and for giving visual feedback. It’s important you connect the leads of the switch appropriately to the Pi - if you connect them elsewhere be sure to edit the source code!
The picture below, commonly blown all over the internet, is handy - however it has the mistake of not explicitly clarifying the orientation on the Pi board itself.
I’m not going to get into how to configure an FTP server in this tutorial, but it’s pretty straight forward in most distributions. You can have this FTP server on the Pi itself - but I personally believe the Pi is better suited to doing one task and doing it well.
My FTP is on a remote server that I can access worldwide with my credentials. This is particularly beneficial in that it allows you to access files from anywhere with a FTP/SFTP client, or point your Apache server index page to the FTP directory and access your photos via HTML. So in my case, the Pi is used solely to transport the files to the ‘master’ server, which is running Apache and has a PHP index that collates all the images and lays them out instagram style. I may write a tutorial for this at a later date.
Most my image fetching/editing is done off my phone. On Android there is a great program called “Synchronize Ultimate” that allows you to poll for changes and fetch from an FTP/SFTP/SCP host automatically. So as I take my photos they automatically sync to my phone and can be edited and shared on social media. You may also have to download “media Re.Scan” to force your gallery to refresh the new images - this is hit or miss on some phones, and not always required.
Anyhow, that’s about all there is to enjoying instant snaps on a pro SLR camera and getting them directly your hosting or phone in a jiffy, without the headaches of pulling SD cards every photo shoot. Of course, extremely beneficial if you’re a pro photographer in a studio and want to streamline your work flow.